| Help for Alpine - XOAUTH2 |
| You are in Home > Miscellaneous > XOAUTH2 > Setting XOAUTH2 in Outlook |
Setting up Outlook is a very nice experience. Once you understand how the authentication flow works in Outlook, it leaves almost all of the work to be done by Alpine and Microsoft's servers. The complexity of the process is invisible to the user.
First, you need to know what to write for your INBOX and SMTP settings.
inbox-path={outlook.office365.com/ssl/user=YourID@outlook.com/auth=xoauth2}INBOX
smtp-server=smtp.office365.com/user=YourID@outlook.com/submit/auth=xoauth2
Alpine supports two different types of authorization flows for Outlook, that is, you can get your refresh and access tokens in two different ways. The default flow in Alpine is called the Device flow, and you do not need to configure Alpine in any special way to use it. However, Alpine also supports the Authorize flow, and if you intend to use it, you will need to set up the client-id and client-secret in the XOAUTH2 CONFIGURATION SCREEN, which can be reached from the Main Menu Screen by pressing S U before you start the authentication process.
This guide will show the Device method. The way that Authorize flow works is similar to the way you would authenticate in Gmail. Please pay attention that for Outlook the code you are supposed to enter into Alpine is the last URL you will see in your browser.
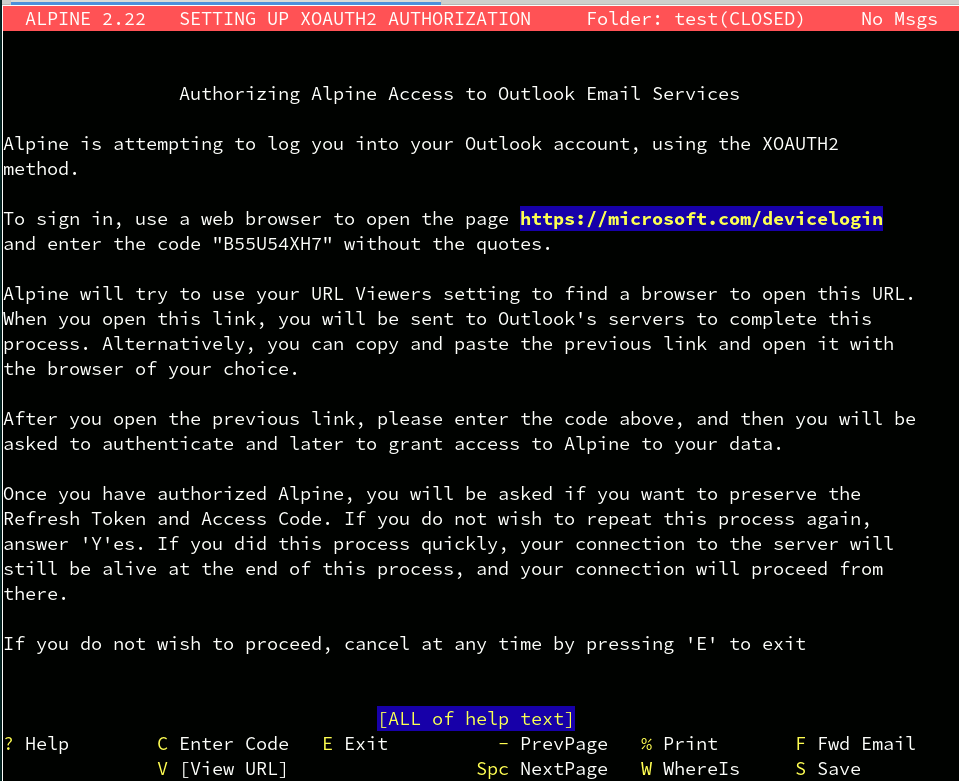
The first time you try to login to an outlook.com account, you will be presented
with the following screen.
In the screen it is explained what will happen throughout this process. The most relevant information for us at this moment appears at the top of the screen, and it says that you must point your browser to open a URL and enter a code. We will need a browser that supports javascript. Once you open the URL in the screen, you will see a box where you can enter the code.
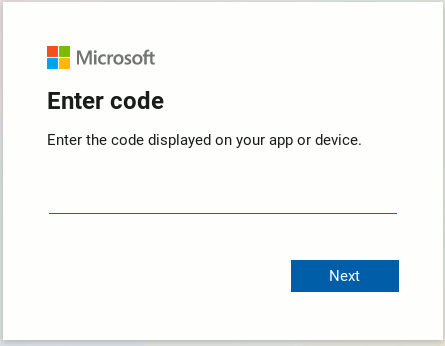
After you have successfully entered the code, your browser will redirect you to sign in to your Outlook account. Please note that this will be done even if you are already signed into the account you want to give access to in Alpine.

Enter your username and password. Outlook will give you a screen that shows the permissions you will be granting to Alpine. For purposes of Alpine these are read, write and send email.

This is a quick explanation of the permissions you are granting Alpine. The first permission allows Alpine to save the refresh token. This is necessary so that you do not have to go through this process every time that you want to login to your account. The purpose of the refresh token is to allow Alpine access your account the next time you want to open your account and is saved securely when your version of Alpine has been compiled with password support (otherwise it is not saved.) Alpine will only access your account using the access token generated by the refresh token only when YOU open your Outlook folder in Alpine. In other words, Alpine will not initiate a session on your behalf unless you start it.
The other permissions are about read and write, and send email are well explained in the consent screen.
In order to grant access to Alpine to read and send email, click yes in the blue box in the bottom. After you have done that, you will see a screen that says
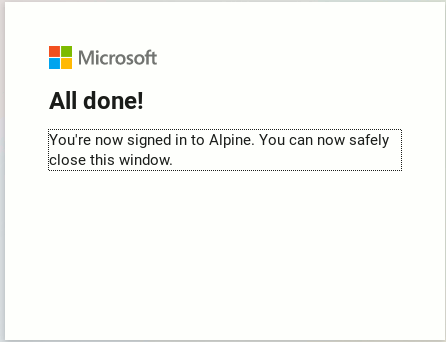
As you can read in the screen, you can close the window, because everything has been set up. Nothing more needs to be done in the browser. Now it is time to go back to Alpine.
During the time that you were doing the previous process Alpine was waiting for this process to end. Alpine has been polling Outlook's servers waiting for the success signal. This will come after all the previous steps have been completed. You do not need to do anything. This notice will probably come within the next 5 seconds that you completed the authorization process.
Once Alpine receives the success notice from the server, it will ask you if you want to save the Refresh Token and Access Code. You can only save these if you have a version of Alpine compiled with password file support. If you refuse to save them in your password file, Alpine will have to repeat all the previous steps the next time you try to use Alpine to login to your outlook account. If you answer yes, Alpine will save them securely in your password file.

What happens after this will depend on how long you took to complete this process. If you took a short time, Alpine will open your connection to the server, but if you took too long, Outlook's server will close the connection. Do not panic, simply repeat the operation you were trying, this time you will not go through the previous steps, and the connection will succeed. In any case, you are all done setting up Alpine with Outlook.
When attempting to send an email, Alpine will use the same codes that it obtained while opening a folder. You do not need to do anything special. However, Outlook did not allow me to send email until I gave it a phone number. After I completed that step, sending email via my outlook.com account was completed successfully.
| You are in Home > Miscellaneous > XOAUTH2 > Setting XOAUTH2 in Outlook |